在Debian 10 Buster上安装Rust
步骤1.在安装任何软件之前,请务必apt在终端中运行以下命令,以确保您的系统是最新的,这一点很重要:
sudo apt update
sudo apt upgrade
使用以下命令下载并在Debian上运行Rust的安装脚本:
curl https://sh.rustup.rs -sSf | sh

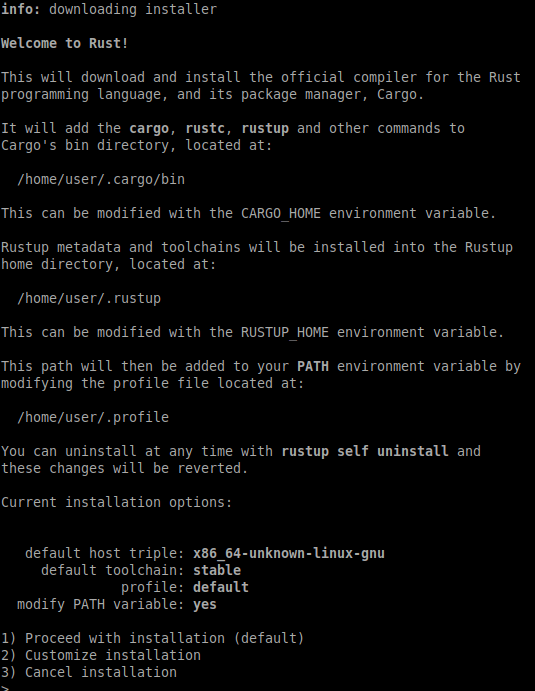
它将显示2个安装选项。我建议使用默认安装(选项1),因为它更快,更容易且不会出现问题。
成功安装后,更新载货和防锈配置文件。这样,您可以在提示符下的任何位置执行rust命令:
这里可以看安装提示
source $HOME/.cargo/env/ .cargo/env
您可以使用以下命令来验证Rust的版本:
rustc – version– version
步骤3.创建一个Rust项目。
首先,创建一个将用作Workspace的文件夹,在其中创建另一个文件夹,该文件位于该文件夹中:
mkdir ~/projects~/projects
cd ~/projects~/projects
mkdir hello_world
cd hello_world
现在,创建文件:
sudo nano hello_world.rs.rs
将以下代码粘贴到新文件中:
fn main() {() {
println!("Hello, Boss Regul!");!("Hello, Boss Regul!");
}}
现在编译并运行程序:
rustc hello_world.rs .rs
./hello_world./hello_world
您将看到Rust代码的输出:
Hello, Boss Regul!
恭喜你!您已经成功安装了Rust。使用本教程在Debian 10 Buster上安装最新版本的Rust编程语言。有关其他帮助或有用信息,我们建议您检查Rust官方网站。
git clone https://github.com/dndx/phantun.git
进入 phantun目录,运行
cargo build
即可
使用 Rustup安装Rust
Rust 由工具 rustup 安装和管理。
所以这里下载安装器
点击安装器,会出现如下的命令行界面
Rust Visual C++ prerequisites
Rust requires the Microsoft C++ build tools for Visual Studio 2013 or
later, but they don’t seem to be installed.
The easiest way to acquire the build tools is by installing Microsoft
Visual C++ Build Tools 2019 which provides just the Visual C++ build
tools:
https://visualstudio.microsoft.com/visual-cpp-build-tools/
Please ensure the Windows 10 SDK and the English language pack components
are included when installing the Visual C++ Build Tools.
Alternately, you can install Visual Studio 2019, Visual Studio 2017,
Visual Studio 2015, or Visual Studio 2013 and during install select
the “C++ tools”:
https://visualstudio.microsoft.com/downloads/
Install the C++ build tools before proceeding.
If you will be targeting the GNU ABI or otherwise know what you are
doing then it is fine to continue installation without the build
tools, but otherwise, install the C++ build tools before proceeding.
Continue? (Y/n)
1
2
3
4
5
6
7
8
9
10
11
12
13
14
15
16
17
18
19
20
21
22
23
24
25
26
27
大意就是没装C++的环境,这里是因为,我之前感觉Visual Studio太大了,就卸了,所以得先安好环境,我选择,先退出,然后把C++的build工具安好,进入对应的网站
安装向导完成后,选择组件
懒得吐槽这个大小了,真的臃肿,安装完成后,重新回到Rust安装向导
这时候就是正常画面了
这里选择默认方式,直接回车即可
测试安装Rust成功,在C盘开个cmd,rustc -V # 注意的大写的 V,这样输出了版本号就是成功安装
下载Visual Studio Code
下载地址,选择合适版本,启动安装向导安装,过程比较简单,略过
配置Visual Studio Code中文界面
可以参考我的这篇文章
安装安装 rls 和 Native Debug 两个扩展
在左边栏里找到 “Extensions”,并查找 “rls”和”Native Debug”
第一个Rust程序(使用cargo方式)
使用cargo方式创建Rust项目流程
新建个文件夹
在 VSCode 中打开新建的文件夹
打开文件夹之后Vscode会刷新一下,然后选择菜单栏中的”终端”-“新建终端”,会打开一个新的终端,注意这里的终端目录就变成了刚才选择的文件夹目录,注意终端的默认shell,因为我之前用VSCode玩过powershell开发,所以默认shell不是cmd,如果不是cmd,下面会报错。
构建一个名叫HelloRust的 Rust 工程目录,在Visual Studio Code最下栏的终端输入cargo new HelloRust,会新建一个Rust工程文件夹,里面含有src/main.rs文件等文件
Visual Studio Code终端执行下列命令
cd ./HelloRust
cargo build
cargo run
1
2
3
可以看到这里输出了helloworld,而且还提示要用snake case
Cargo 创建项目过程解释
在cargo new XXX时 生成了两个文件和一个目录:一个 Cargo.toml 文件,一个 src 目录,以及位于 src 目录中的 main.rs 文件。它也在 当前目录初始化了一个 git 仓库,以及一个 .gitignore 文件。
文件名: Cargo.toml
[package]
name = “HelloRust”
version = “0.1.0”
authors = [“Your Name <you@example.com>”]
edition = “2018”
[dependencies]
1
2
3
4
5
6
7
这个文件使用 TOML (Tom’s Obvious, Minimal Language) 格式,这是 Cargo 配置文件的格式。
第一行,[package],是一个片段(section)标题,表明下面的语句用来配置一个包。随着我们在这个文件增加更多的信息,还将增加其他片段(section)。
接下来的四行设置了 Cargo 编译程序所需的配置:项目的名称、版本、作者以及要使用的 Rust 版本。Cargo 从环境中获取你的名字和 email 信息,所以如果这些信息不正确,请修改并保存此文件。
最后一行,[dependencies],是罗列项目依赖的片段的开始。在 Rust 中,代码包被称为 crates。这个项目并不需要其他的 crate,不过在第二章的第一个项目会用到依赖,那时会用得上这个片段。
文件名: src/main.rs
fn main() {
println!(“Hello, world!”);
}
1
2
3
Cargo 为你生成了一个 “Hello, world!” 程序之前项目与 Cargo 生成项目的区别是 Cargo 将代码放在 src 目录,同时项目根目录包含一个 Cargo.toml 配置文件。
Cargo 期望源文件存放在 src 目录中。项目根目录只存放 README、license 信息、配置文件和其他跟代码无关的文件。使用 Cargo 帮助你保持项目干净整洁,一切井井有条。
Cargo构建并运行解释
Cargo 在target/debug/下创建一个可执行文件
在执行cargo build后,Cargo 在项目根目录创建一个新文件:Cargo.lock。这个文件记录项目依赖的实际版本。这个项目并没有依赖,所以其内容比较少。一般永远也不需要碰这个文件,让 Cargo 处理它就行了。
快速检查代码确保其可以编译,但并不产生可执行文件cargo check,通常 cargo check 要比 cargo build 快得多
发布(release)构建
当项目最终准备好发布时,可以使用 cargo build –release 来优化编译项目。这会在 target/release 而不是 target/debug 下生成可执行文件。
这些优化可以让 Rust 代码运行的更快,不过启用这些优化也需要消耗更长的编译时间。这也就是为什么会有两种不同的配置:一种是为了开发,你需要经常快速重新构建;另一种是为用户构建最终程序,它们不会经常重新构建,并且希望程序运行得越快越好。如果你在测试代码的运行时间,请确保运行 cargo build –release 并使用 target/release 下的可执行文件进行测试。
rustc执行第一个Rust程序
Rust 是一种 预编译静态类型(ahead-of-time compiled)语言
创建一个文件夹,新建文件,文件名: main.rs
fn main() {
println!(“Hello, world!”);
}
1
2
3
使用 Rust 编译器编译代码 rustc main.rs
运行$ ./main # Windows 是 .\main.exe
————————————————
版权声明:本文为CSDN博主「尸者狗」的原创文章,遵循CC 4.0 BY-SA版权协议,转载请附上原文出处链接及本声明。
原文链接:https://blog.csdn.net/Alexhcf/article/details/107755195
